
Spending up to five months away from home and overseas, lugging my full DSLR equipment everywhere I go just wasn’t gonna happen (even though I still try to, and rarely use it due to the size and bulk and lack of discretion). I had tried smaller solutions, such as the Canon S100 and Sony NEX5N – the latter I still use with an underwater housing for recreational scuba diving – they still represented another device one had to carry for the occasional snaps or postcard shots.
It was not until the end of 2012 that I switched over to the iPhone 5, and discovered the very fast camera it possesses – a much better improvement over the ‘shutter lag’ of the iPhone 4 and 4s. Being a professional photographer, I enjoy post processing/editing my photos and having the creative control over everything I shoot for that extra quality. I immediately jumped online and researched the inumerable apps available to the iPhone for editing/manipulation, and the rest was history.
I had found the solution I had been looking for. The iPhone 5 and 5s is more than capable of churning out 8×12 inch prints (A4 size) in good lighting, and smaller sizes easily – I dont think many people using the iPhone would be printing any larger anyway. If I were going to, I’d reach for my DSLRs or the NEX5N etc.
Below are the main apps I use for editing & manipulation in which I will show you the before and after effects in examples below.
EDITING
1) Snapseed – FREE – this app is great since becoming free to download on the app store, with a host of features and special effects – my favourite being the selective adjustment where you can brighten or darken selected parts of the image.
2) PhotoToaster – $2.99 – my third most used apps, for quick changes to Sepia, B&W and other effects fast.
3) Pro HDR – $1.99 – the first ever photo app I downloaded and my second most used – takes 1 underexposed and 1 overexposed photo to combine into a HDR style photo to show more details. This is great for highly exposed scenes where you want to retain details and vice versa. Only works well with non moving scenes however, otherwise there will be light trails or blur by movement.
4) Camera+ – $1.99 – my favourite and go-to app for majority of my photos because of one unique function – the Clarity function. One touch of it and it will brighten underexposed areas as well as increase sharpness and clarity to give your photos an instant pop. Although the app has many other features this is the one I use the most, and you can see the results below. The clarity function naturally results in more noise however, so be wary of using it with photos taken in low light or areas with lots of shadows.
MISCELLANEOUS
PhotoCollage – FREE – this is great for making photo collages, putting together 2 or 5 photos is only a touch away. Great for showing a place or scene in various angles in a collage instead of just a single photo.
InstaEffect – FREE – I rarely touch this app, but I’m sure there are many out there that would love the cool effects and colours it can throw over a photo. The only time I use this is for my Star Wars Re-Imagined by Lego series with my iPhone which is still being shot.
PhotoSync – $3.99 – absolutely invaluable to me and worth every cent! Fast selection of which photos from your camera to send wirelessly to your laptop or computer. I can usually send about 20 photos from my iPhone to my Macbook Pro in a few seconds flat. This is great if you want to do some further editing or retouching of the photos via Lightroom or CS which I do sometimes.
PHOTO EXAMPLES
Riding a scooter through rice fields and ponds near Hoi An, Vietnam. Taken with normal camera, then Clarity applied later to bring out more colours and contrast as it was a dull overcast day
The world’s fastest production car – the Bugatti Veyron – parked everyday on Rodeo Drive, Los Angeles. I used the Clarity function of Camera+ to once again bring out the colours and details of the car.

A small shrine in Shinjuku, Tokyo. I used Pro HDR to merge 2 photos together as the foreground tori gate was quite underexposed. After the photo has been taken, the app allows for further adjustments in exposure, saturation, warmth etc – very handy! On another note, if you have time – dont catch the train from Shinjuku to Shibuya – spend a few hours walking there instead, the quaint little stores and boutique shops make it a very enjoyable experience in which many tourists simply miss out on. It is under 5km in a straight line.

I dont really know how to explain this photo, but how awesome is his little car! Saw this well dressed middle aged man driving this in Shinjuku, luckily he stopped at the traffic lights long enough to get a shot of him. Later on I applied Clarity to make it pop more.

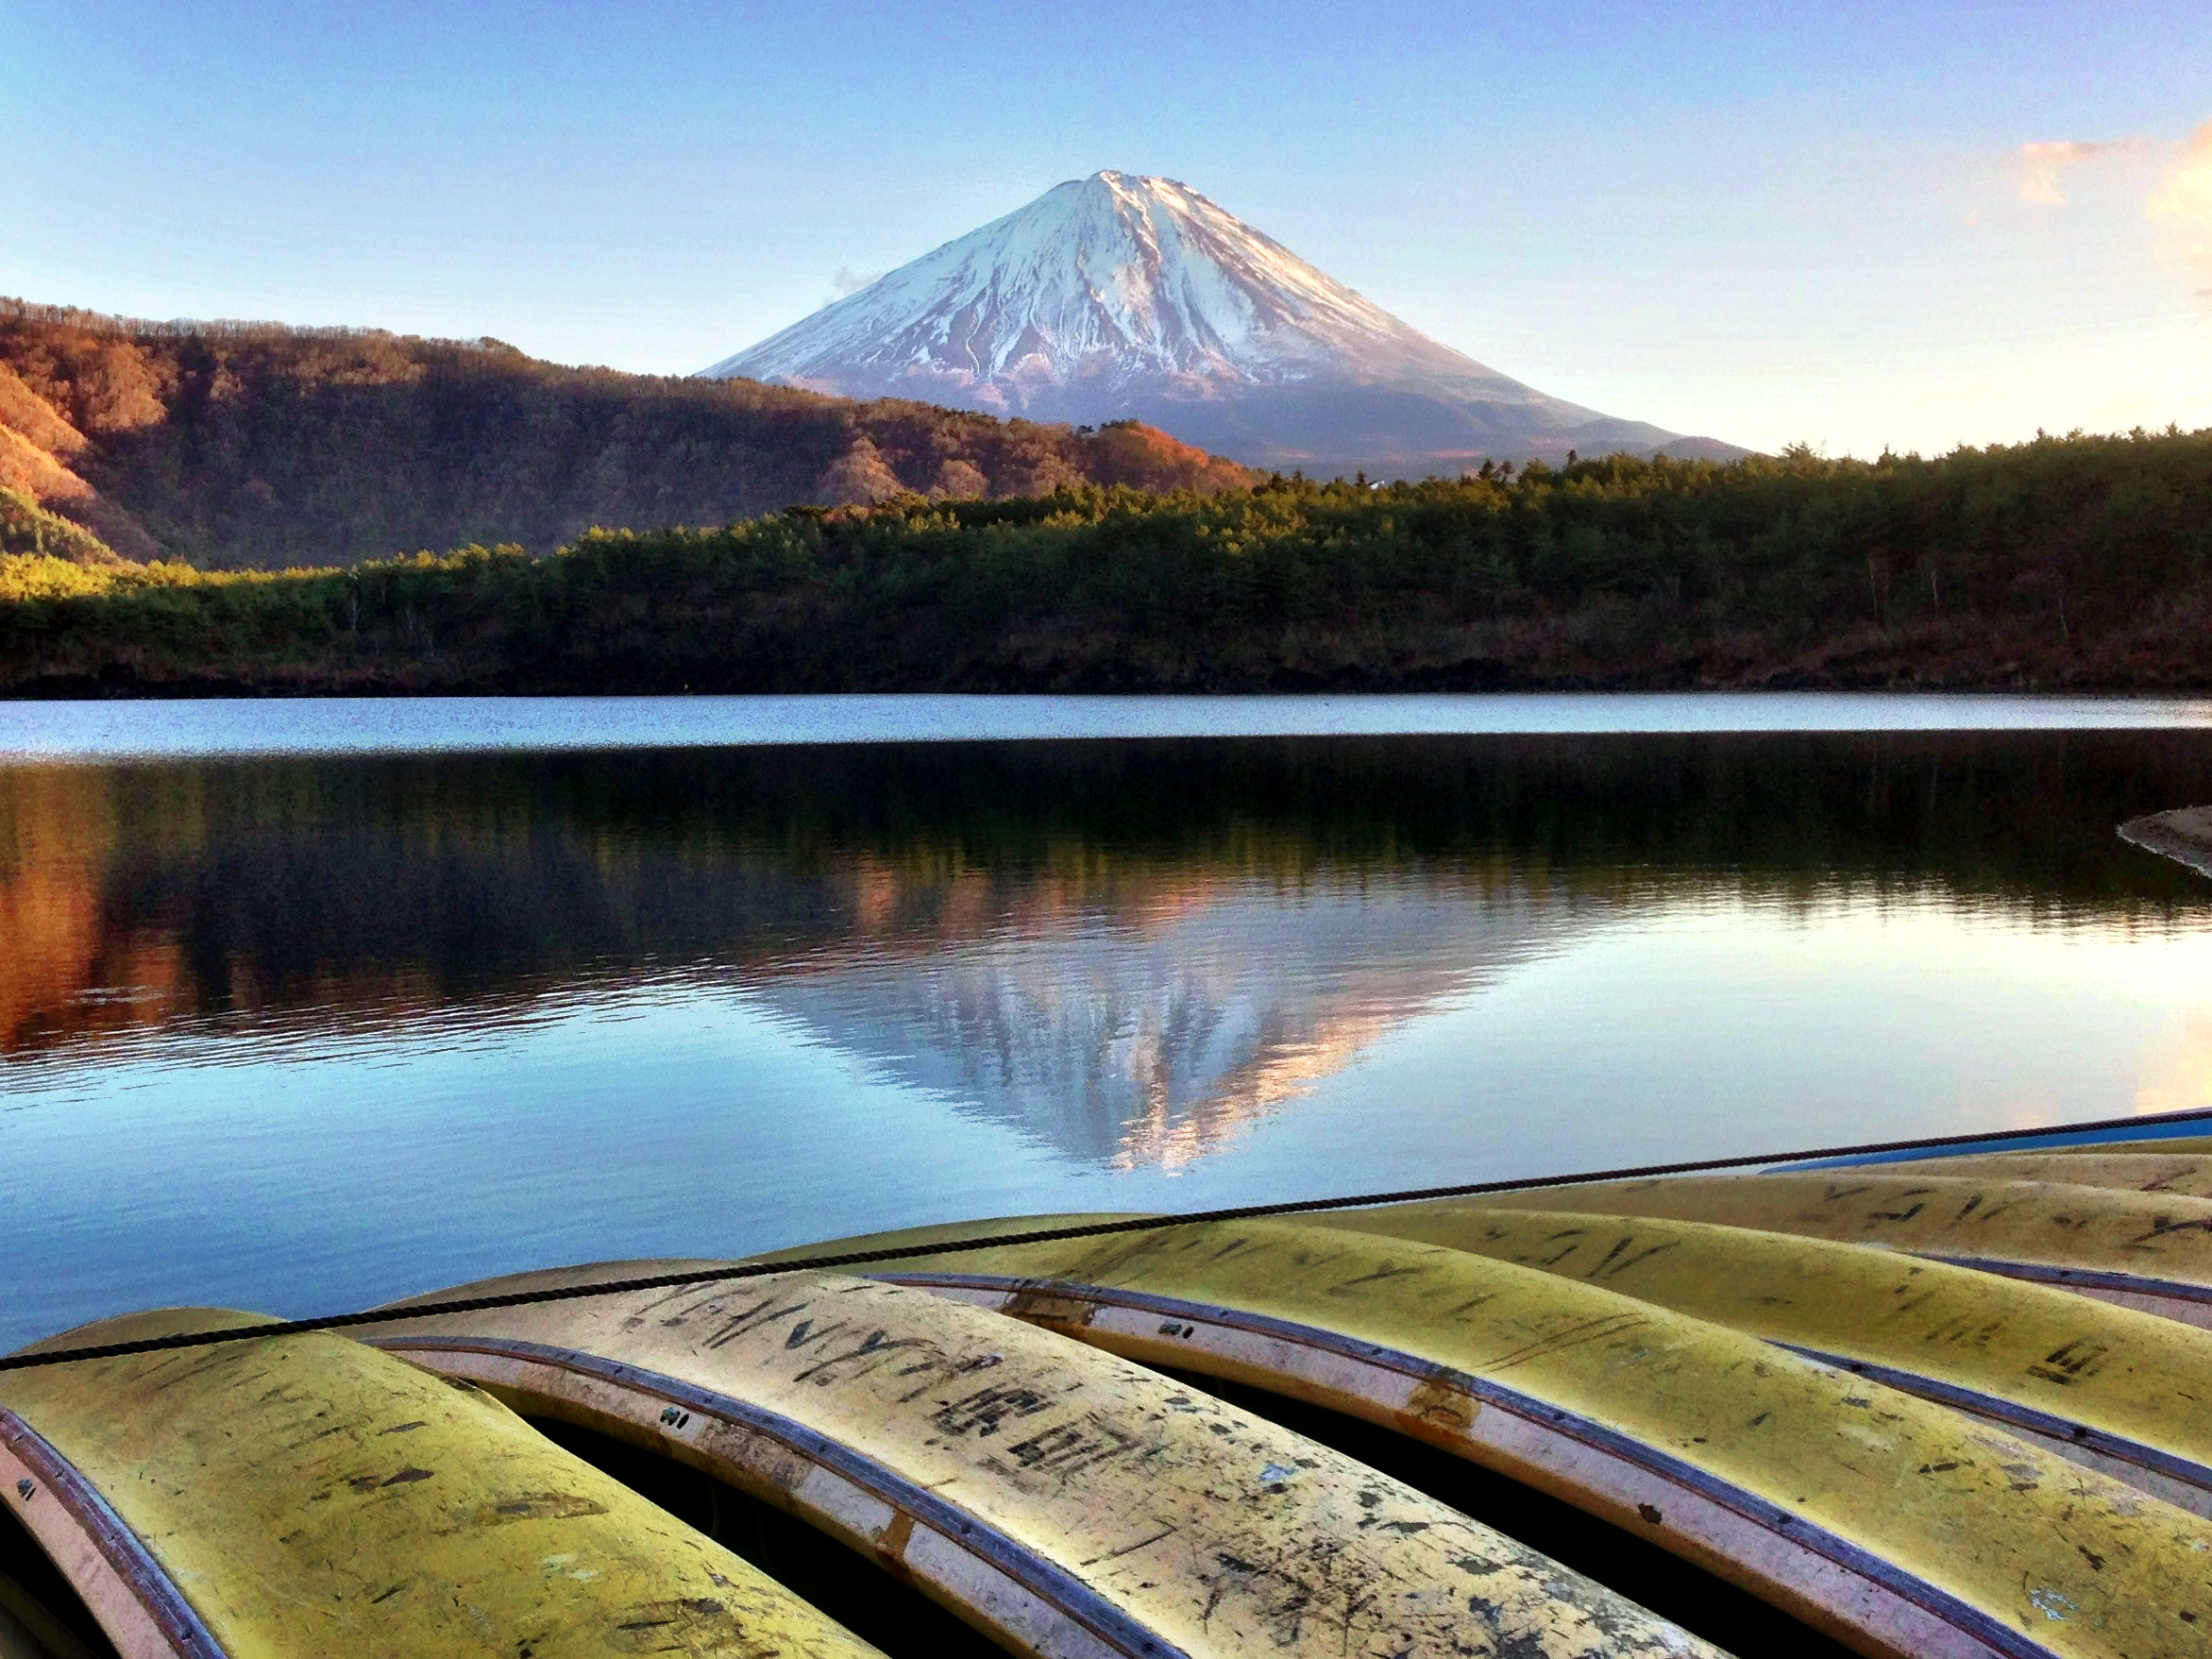
This was my return to Mount Fuji in Japan after nearly 7 years. I used Pro HDR to achieve the details in the foreground and background, then loaded it to my laptop via PhotoSync and then reduced some noise via Lightroom. I really like this as the mountain is well framed by the stack of rowing boats in the foreground.
This is a life sized, 18m high original Gundam machine, outside of Diver City shopping complex on Odaiba Island, Tokyo – Japan. Not satisfied with the original shot, I used Clarity on it to give the machine more oomph. This is a side by side comparison of before and after Clarity. However the difference is more notice during daylight as there is more dynamic range for the program to work with. But you can see that below in other examples. 
Toyota Mega Web museum on Odaiba in Japan is a must for any car enthusiast. In the historic side of the museum, there is a vintage set up complete with faux vintage surroundings and props and period items. Because I wanted to capture that vintage essence, I used Sepia via PhotoToaster, then Clarity via Camera+ to make it look more aged. 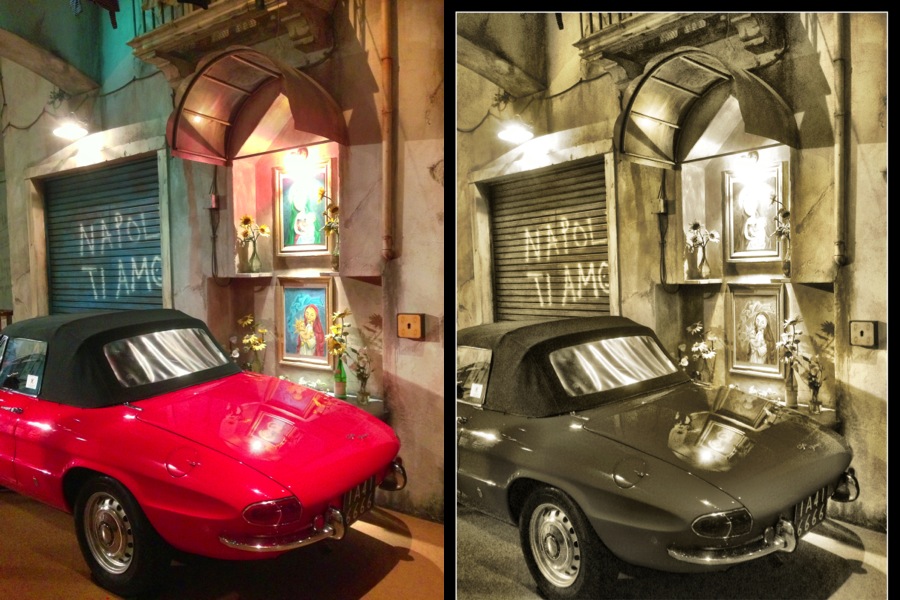
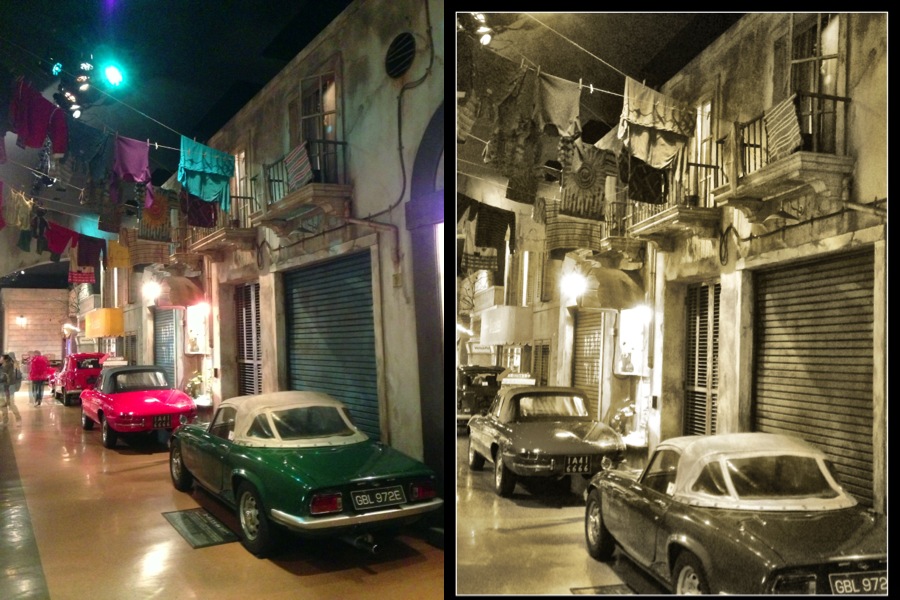
This is another angle of the above shot, but wider. I hate crooked shots, so I applied the same as above as well as the straighten too via Camera+ – the straighten tool is available in most photo apps and is an often overlooked function.
At my resort in Cancun, Mexico. This gives you a better idea of how Clarity works in daylight and the difference it makes with one simple touch. 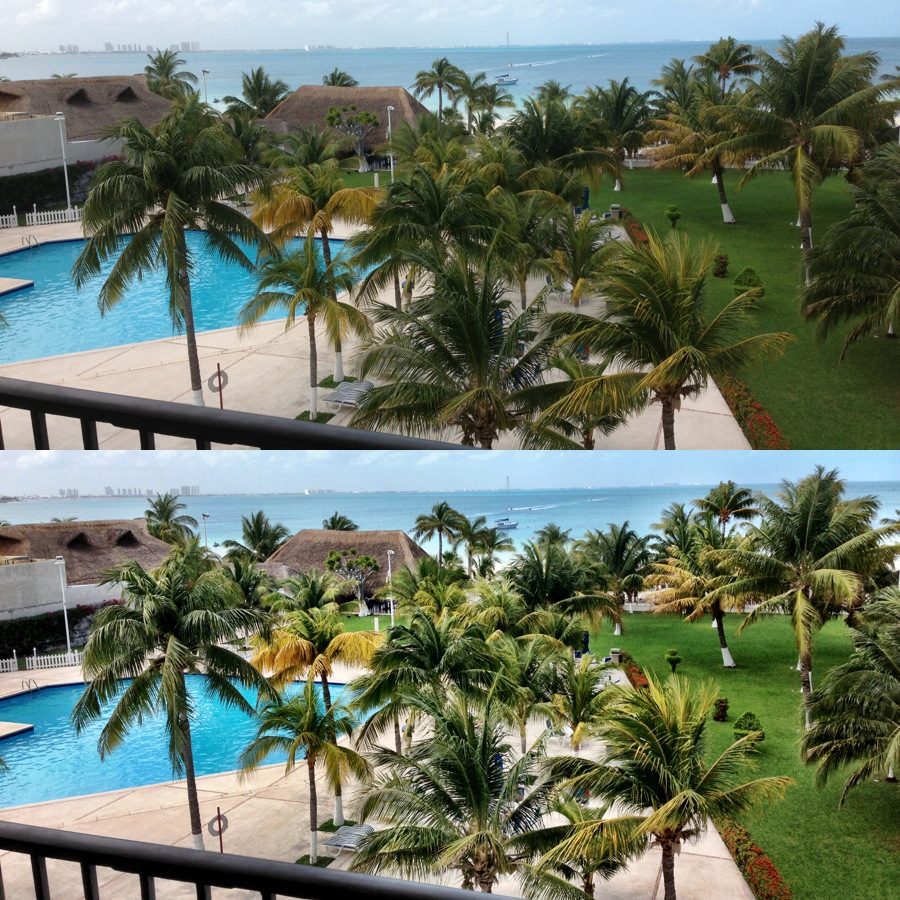
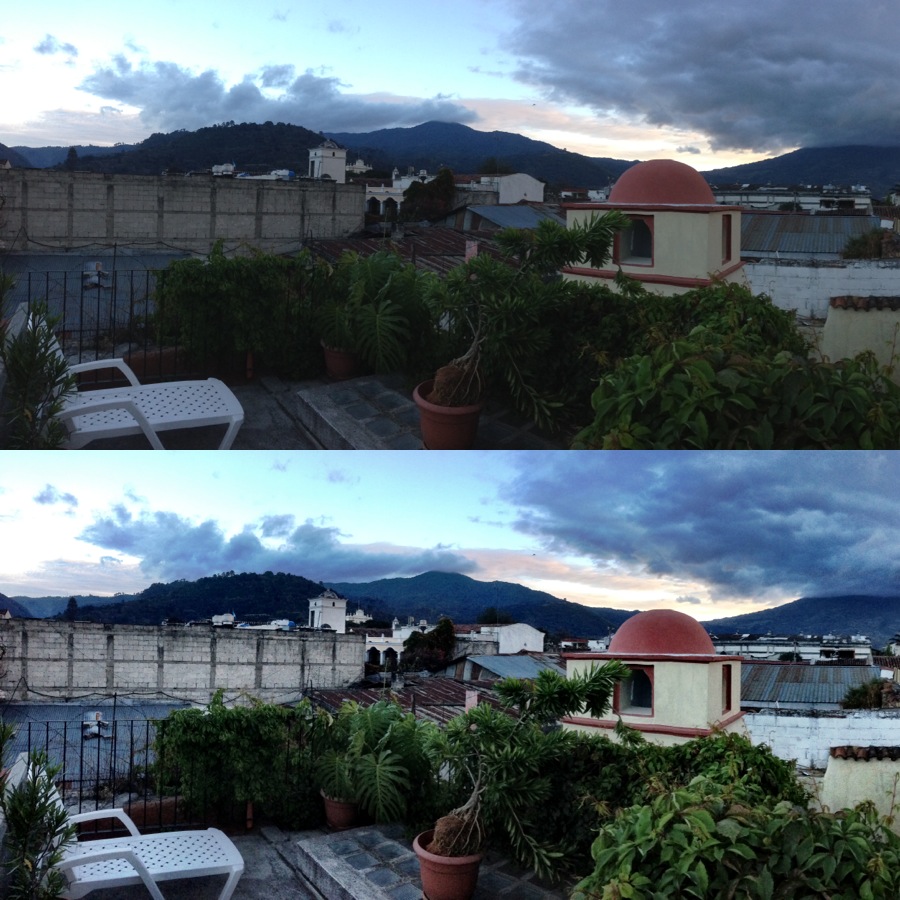
On the rooftop of my hotel in Antigua, Guatemala facing one of the volcanoes overlooking the town. Here I used Clarity again, and it is able to brighten up previously darkened areas in the original photo.
Thats the end of my beginner’s guide to iPhone photography and editing. My biggest word of advice is – BE CAUTIOUS. A new iPhone is rare in many countries and often seen as an object of status. Therefore muggings and robberies purely for iPhones whether you are on foot or on a vehicle is not unheard of. Be careful of where you pull your phone out to get that amazing shot.
Happy shooting!

Reblogged this on aly|t|evasin and commented:
When it’s just about time to upgrade the 4-years-old iPhone 4 of mine 🙂